目录
- 常用属性
- 案例一
- 案例二
- 参考
pointer-events文档
pointer-events CSS 属性指定在什么情况下 (如果有) 某个特定的图形元素可以成为鼠标事件的 target
常用属性
/* Keyword values */
pointer-events: auto; /* 与pointer-events属性未指定时的表现效果相同 */
pointer-events: none; /* 元素永远不会成为鼠标事件的target */
/* Global values */
pointer-events: inherit;
pointer-events: initial;
pointer-events: unset;
案例一
看一段 css 和 js 代码,由里到外嵌套
<style>
      .box-green {
        width: 800px;
        height: 300px;
        background-color: green;
      }
      .box-yellow {
        width: 500px;
        height: 250px;
        background-color: yellow;
      }
      .box-red {
        width: 300px;
        height: 200px;
        background-color: red;
      }
    </style>
    <p
      class="bb41-4f1b-1159-e6b2 box-green"
      id="box-green"
    >
      <p
        class="4f1b-1159-e6b2-ed76 box-yellow"
        id="box-yellow"
      >
        <p
          class="1159-e6b2-ed76-5d03 box-red"
          id="box-red"
        ></p>
      </p>
    </p>
    <script>
      let boxGreen = document.querySelector('#box-green')
      let boxYellow = document.querySelector('#box-yellow')
      let boxRed = document.querySelector('#box-red')
      boxGreen.addEventListener('click', function () {
        console.log('boxGreen click')
      })
      boxYellow.addEventListener('click', function () {
        console.log('boxYellow click')
      })
      boxRed.addEventListener('click', function () {
        console.log('boxRed click')
      })
    </script>
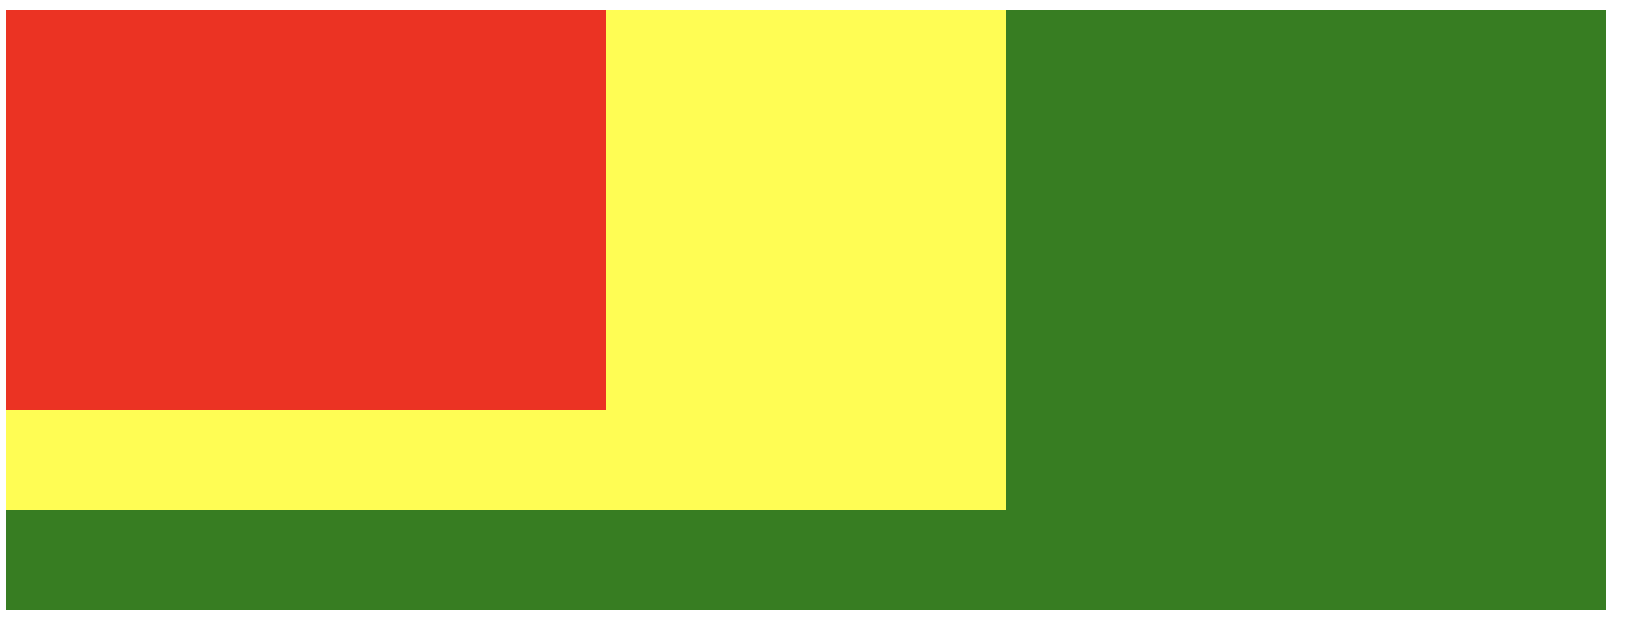
点击红色部分 事件触发顺序
boxRed click
boxYellow click
boxGreen click
点击黄色部分 事件触发顺序
boxYellow click
boxGreen click
点击绿色部分 事件触发顺序
boxGreen click
案例二
修改一下布局,外层相对定位,内层绝对定位
<style>
      .box-green {
        width: 800px;
        height: 300px;
        background-color: green;
        position: relative;
      }
      .box-yellow {
        position: absolute;
        left: 0;
        width: 300px;
        height: 250px;
        background-color: yellow;
      }
      .box-red {
        position: absolute;
        right: 0;
        width: 300px;
        height: 250px;
        background-color: red;
      }
    </style>
    <p
      class="655e-5619-bb41-4f1b box-green"
      id="box-green"
    >
      <p
        class="5619-bb41-4f1b-1159 box-yellow"
        id="box-yellow"
      ></p>
      <p
        class="bb41-4f1b-1159-e6b2 box-red"
        id="box-red"
      ></p>
    </p>
    <script>
      let boxGreen = document.querySelector('#box-green')
      let boxYellow = document.querySelector('#box-yellow')
      let boxRed = document.querySelector('#box-red')
      boxGreen.addEventListener('click', function () {
        console.log('boxGreen click')
      })
      boxYellow.addEventListener('click', function () {
        console.log('boxYellow click')
      })
      boxRed.addEventListener('click', function () {
        console.log('boxRed click')
      })
    </script>
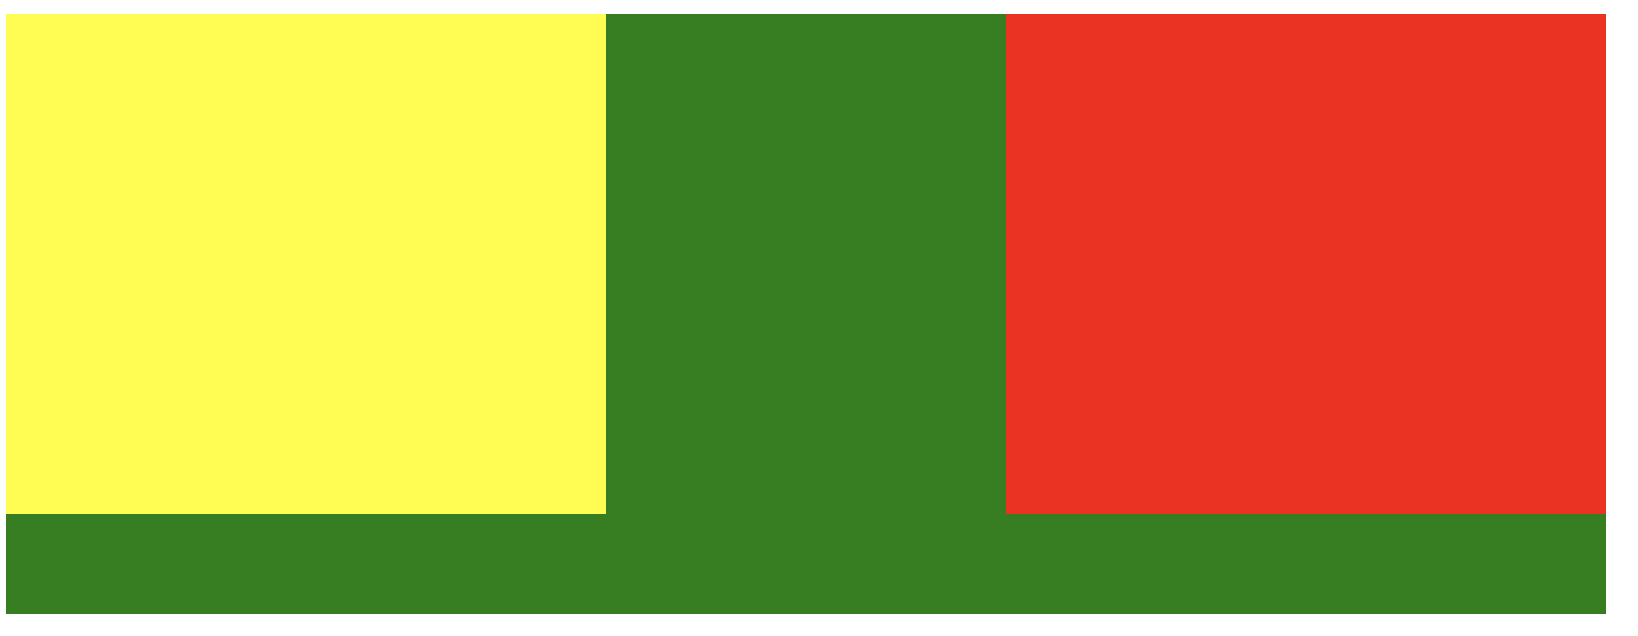
点击绿色部分 事件触发顺序
boxGreen click
点击黄色部分 事件触发顺序
boxYellow click
boxGreen click
点击红色部分 事件触发顺序
boxRed click
boxGreen click
如果设置css属性
.box-red {
  position: absolute;
  right: 0;
  width: 300px;
  height: 250px;
  background-color: red;
  /* 取消鼠标事件 */
  pointer-events: none;
}
点击红色区域,只会触发如下事件,实现了穿透效果
boxGreen click
参考
css 点击穿透 pointer-events: none;一般用于遮罩
到此这篇关于css属性pointer-events实现点击穿透的示例代码的文章就介绍到这了,更多相关css pointer-events点击穿透内容请搜索脚本之家以前的文章或继续浏览下面的相关文章,希望大家以后多多支持脚本之家!


